Security testing for microservices is particularly hard, as those services are usually highly interconnected. In this article, I will show you a way to simplifying your security testing by using feedback-based fuzzing, a highly automated testing approach. In 5 easy to follow steps, I will guide you through the whole testing process and show you how to secure your microservices against common web vulnerabilities, such as (SQL) Injections and Remote Code Executions, demonstrated on an unreleased version of the German COVID-19 Contact Tracing App (CWA).
Step 1: Pick Your Target
To provide secure and reliable web services, it is first of all necessary, to get familiar with the backend structure, and the architecture of the application. It is important to zoom out and get a rough overview in order to recognize the first interfaces, where automated fuzz testing will most likely uncover the most critical vulnerabilities.
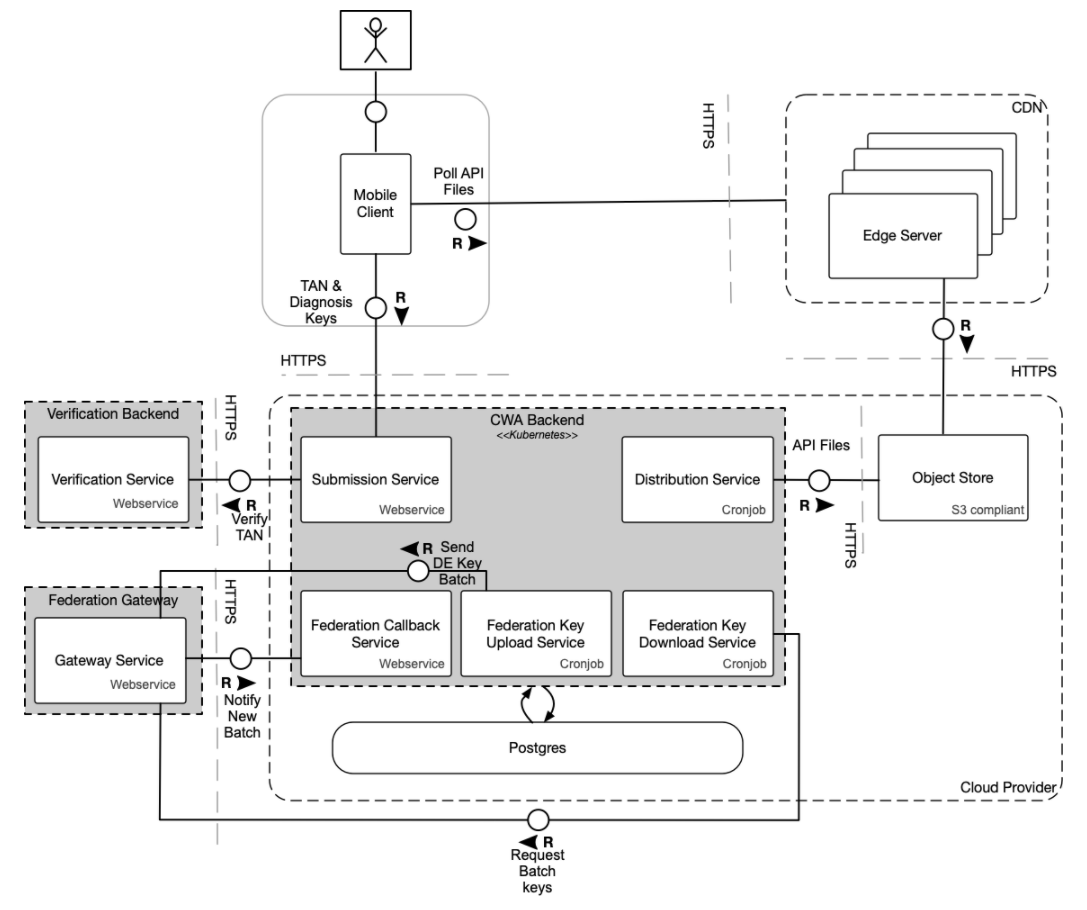
I would like to demonstrate this using an example: This scheme illustrates the architecture of the German Covid-19 contact tracing app backend. In Germany, this app is used by large parts of the population to retrace Covid-19 infections and notify people about potential risks. The app also tracks Covid-19 test results and sends them to the user.
Looking at the architecture, we can see that the action of submitting test results is first processed by the submission service, which in turn validates the data via the verification service. This interaction is a perfect target for fuzzing since it processes inputs and is not triggered by cron jobs (i.e. distribution).
Step 2: Enable Your Web Services for Fuzzing
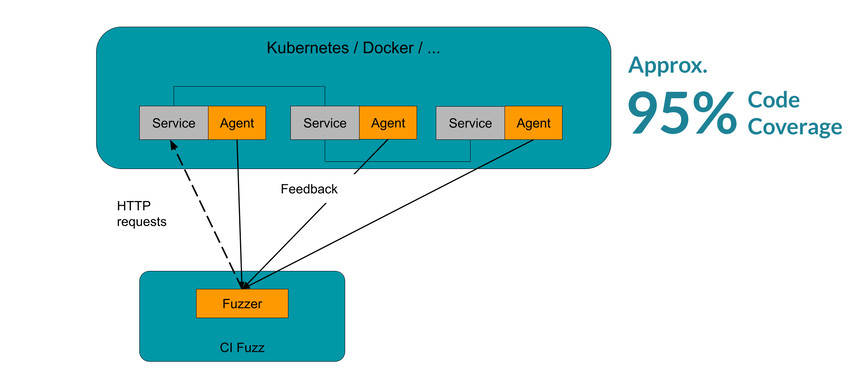
To make full use of modern fuzz testing techniques, the fuzzer requires feedback from the application under test. In a JVM microservice environment, this is made possible by Java agents. Independent of the binary, they can be added to multiple Java applications, allowing fuzzing of connected services.
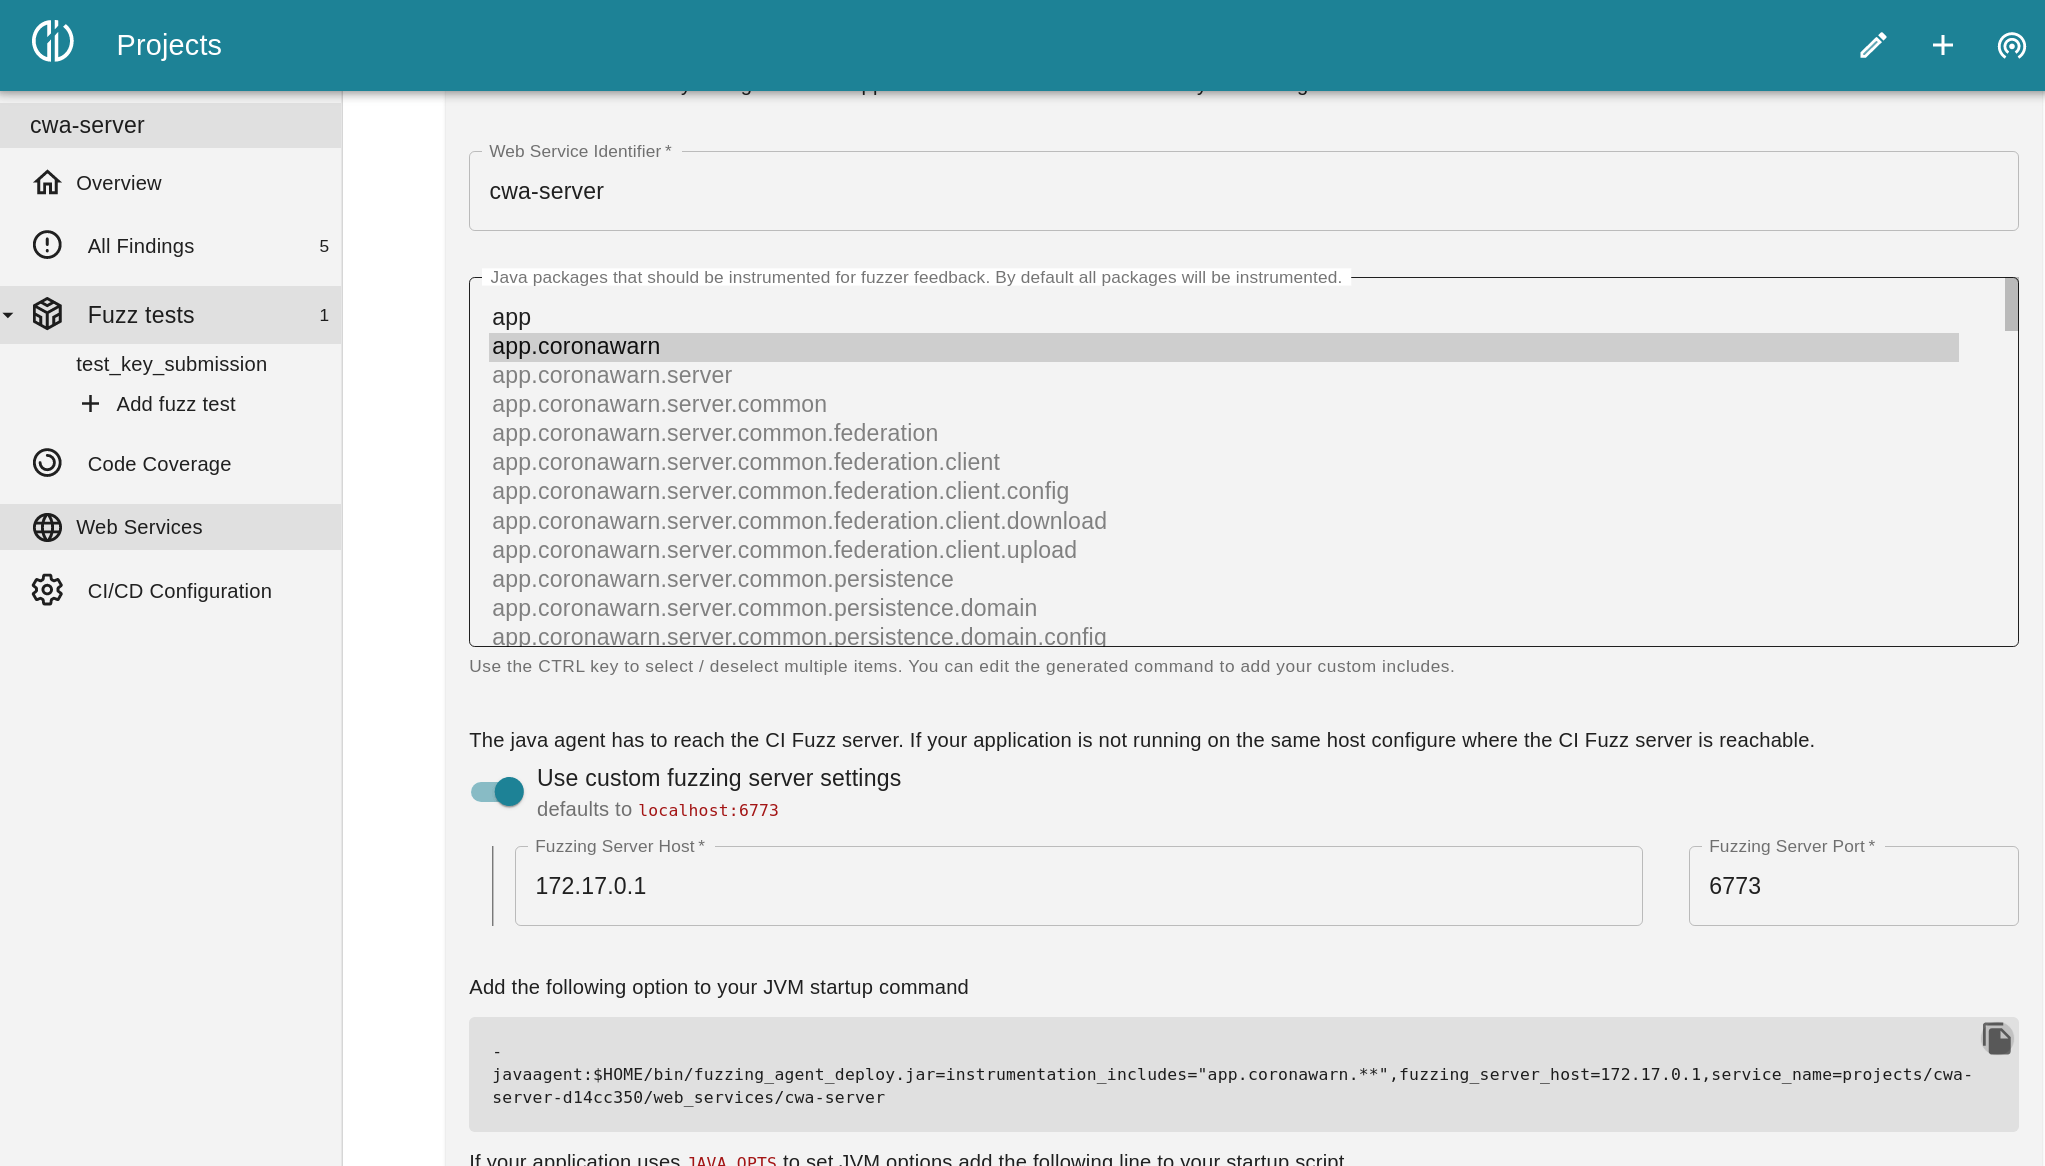
To secure a web service, you will need to get the backend up and running, so it can be prepared for the fuzz test. With Code Intelligence’s CI Fuzz extension for VS Code, this is pretty easy. First, you need to create a new project. After the project has been initialized, the addition and preparation of the web services can be started.
 Adding Services to a fuzz test with CI Fuzz
There are a lot of parameters that you can configure in CI Fuzz. For example, you can choose specified Java packages for the fuzzer, so that only classes from these packages are instrumented. This is quite useful if you don’t want the fuzzer to get lost in external libraries. But to get started, you can simply initialize the project with the default settings.
Setting up the CI Fuzz Java agent does not take much time. A big advantage of this fuzzing approach is that it works in any environment where a Java agent can be attached. In the case of the CWA backend, this means that we add the Java agent to the Docker images of the submission and verification service and set the options that we can copy directly from CI Fuzz. Apart from this modification, the existing docker-compose setup remains completely unchanged.
.png?width=731&name=MicrosoftTeams-image%20(10).png) Java agents can be added with very minor modifications
Java agents can be added with very minor modifications
Java AgentsJava agents (often called "Fuzzing Agents") are special Java applications that use the Instrumentation API to modify JVM bytecode during runtime. Thus, they feed information about your application back to your fuzzer. This allows you to measure and maximize code coverage. In most cases, it's enough to add a single option to your Java command. Since many services run in a Docker container, the fuzzing backend is not accessible on localhost. To enable the Java agent to communicate with the fuzzing server, the Docker host IP must be configured. |
Step 3: Configure the Fuzz Tests
Now, we provide the fuzzer with a description of the API that we want to test. This information is used by the fuzzer to generate relevant HTTP requests that follow the API specification. Such requests have a much higher chance of passing the validation layer of the web service. For our example, we can configure the fuzzer to use the OpenAPI specification of the submission service. This allows the fuzzer to construct valid JSON payloads for the submission data and trigger the interesting parts of the code.
 Truncated OpenAPI specification
Step 4: Add HTTP Requests to Get the Fuzzer Started
To accelerate the fuzzing process, it is possible to provide seed requests that the fuzzer uses for further mutation. This step is entirely optional and based on the API definition, a set of requests will automatically be generated. Since the fuzzer operates on simple HTTP requests, it is also easy to seed the fuzzer with existing tools such as integration tests, manual API testing tools, or even the browser.
For the CWA submission service, we use a single seed request with a valid JSON post body, which was copied from one of the automated Java tests.
After starting the test we verify that the number of coverage counters increases which is a sure sign that the fuzzer is finding new code paths.
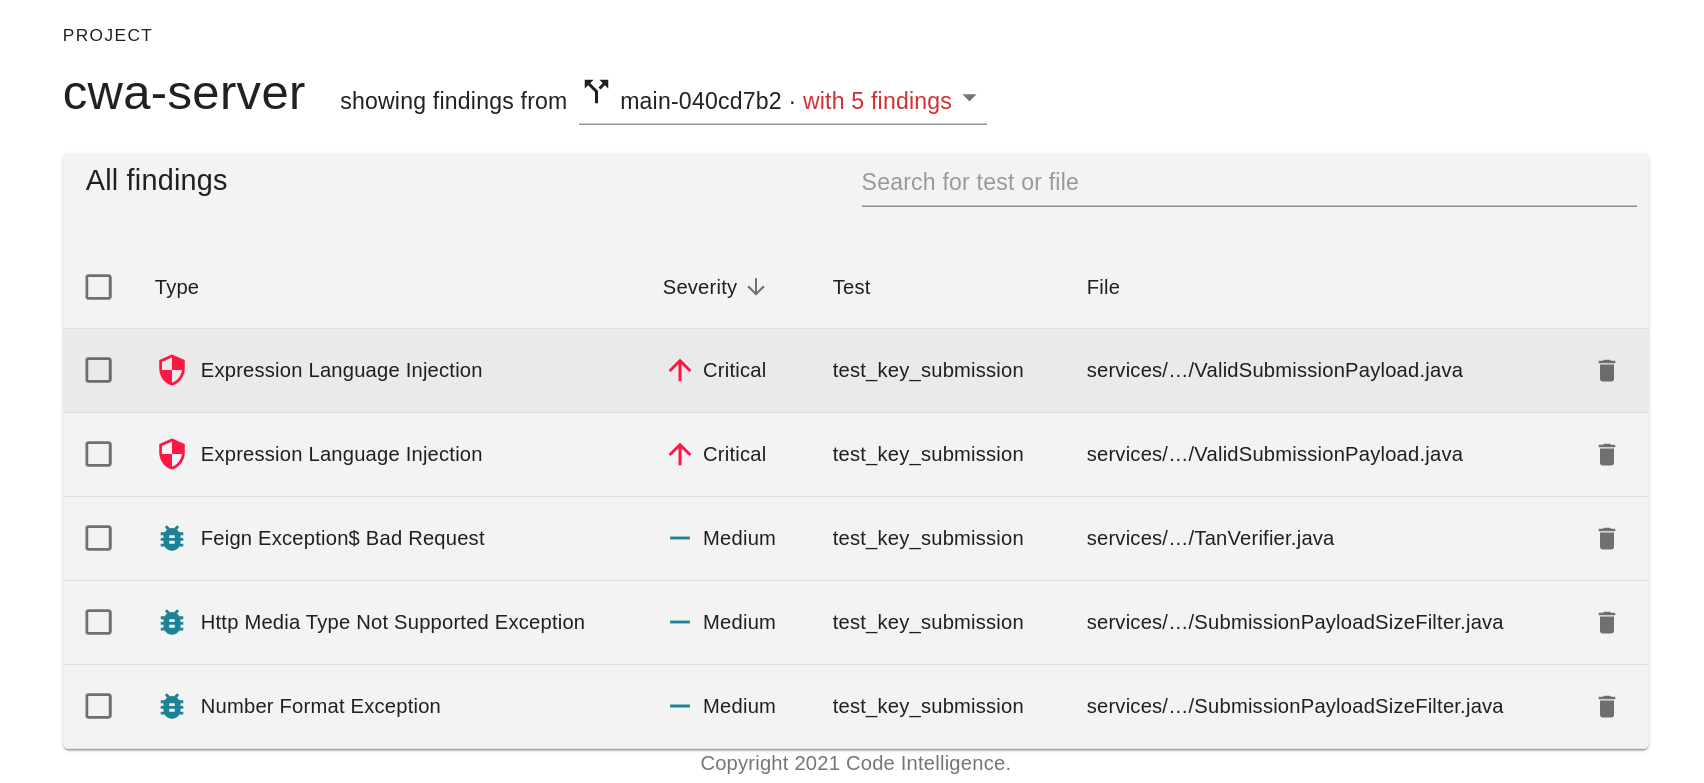
Step 5: Wait Until All the Bugs Have Been Collected
When the fuzzer is done, all the findings and exceptions will be listed with detailed feedback that includes the log, helpful links and the description. Now you can start debugging!
See the Process in Action!
I hope you now have an idea of how fuzz testing can be implemented to secure complex web services. However, I know that reading about the implementation can be a bit tedious. The best thing is to see the process in action. I have recorded a more detailed breakdown of how we secure the Covid-19 tracing app. Click below to see the whole recording.
